Today I am going to show you how to set up Google Account login with Socialite in laravel 8.0. In this article we use laravel Socialite Login with google Account example.
Step 1: Install Laravel 8
composer create-project --prefer-dist laravel/laravel googleLoginStep 2: Install JetStream
composer require laravel/jetstreamStep 3: Install livewire
php artisan jetstream:install livewireStep 4: Install Node packages
npm installrun
npm run devMigrate Database
php artisan migrateStep 5: Install Socialite
composer require laravel/socialiteRead more: Socialite Login with google official doc
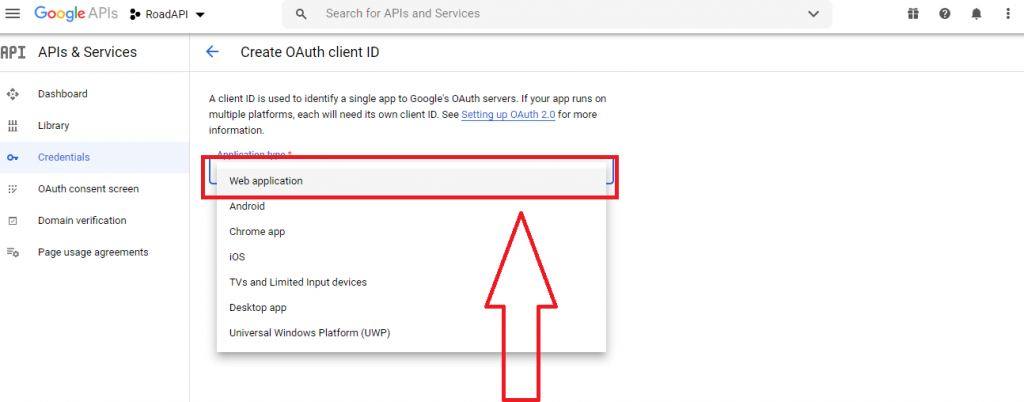
Step 6: Create Google App
In this step, we need a google client id and secret that way we can get information from other users. so if you don’t have a google app account then you can create from here: Google Developers Console. you can find bellow screen.
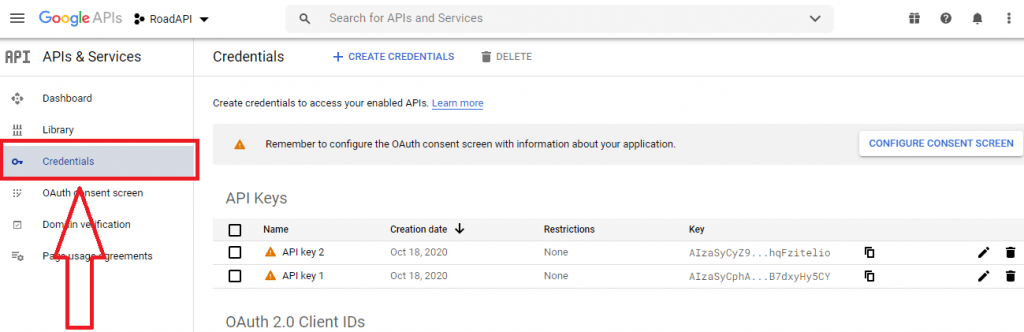

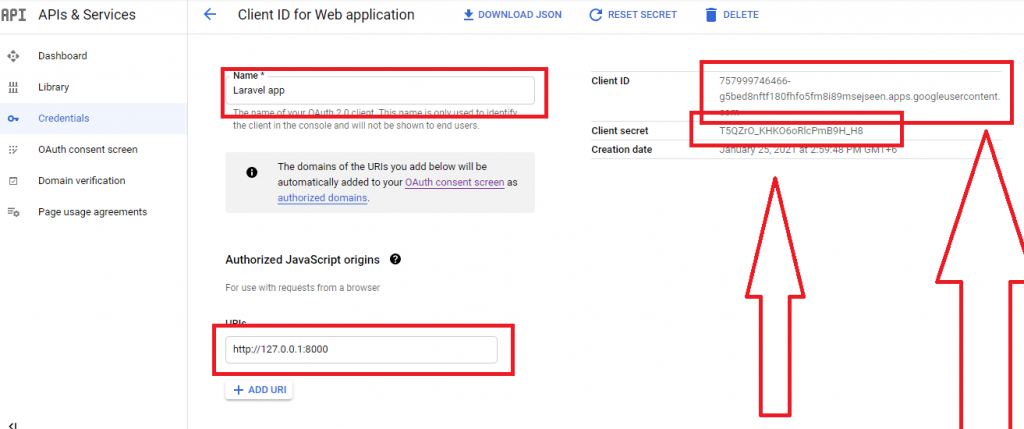
after create account you can copy client id and secret.
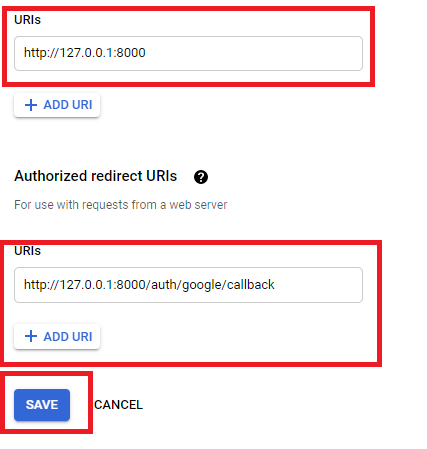
Now you have to set app id, secret and call back url in config file so open config/services.php and set id and secret this way:
config/services.php
 return [
  ---------------
  'google' => [
        'client_id' => 'your_client_id',
        'client_secret' => 'your_client_secrect',
        'redirect' => 'http://127.0.0.1:8000/auth/google/callback',
    ],
------------
];
Step 7: Add Database Column
In this step first we have to create migration for add google_id in your user table. So let’s run bellow command:
php artisan make:migration add_google_id_columnMigration
<?php

use Illuminate\Database\Migrations\Migration;
use Illuminate\Database\Schema\Blueprint;
use Illuminate\Support\Facades\Schema;

class AddGoogleIdColumn extends Migration
{
    /**
     * Run the migrations.
     *
     * @return void
     */
    public function up()
    {
        Schema::table('users', function ($table) {

            $table->string('google_id')->nullable();

        });
    }

    /**
     * Reverse the migrations.
     *
     * @return void
     */
    public function down()
    {
        Schema::dropColumns('google_id');
    }
}
Update mode like this way:
app/Models/User.php
<?php

namespace App\Models;

use Illuminate\Contracts\Auth\MustVerifyEmail;
use Illuminate\Database\Eloquent\Factories\HasFactory;
use Illuminate\Foundation\Auth\User as Authenticatable;
use Illuminate\Notifications\Notifiable;
use Laravel\Fortify\TwoFactorAuthenticatable;
use Laravel\Jetstream\HasProfilePhoto;
use Laravel\Sanctum\HasApiTokens;

class User extends Authenticatable
{
    use HasApiTokens;
    use HasFactory;
    use HasProfilePhoto;
    use Notifiable;
    use TwoFactorAuthenticatable;

    /**
     * The attributes that are mass assignable.
     *
     * @var array
     */
    protected $fillable = [
        'name',
        'email',
        'password',
        'google_id'
 // updated will be herer
    ];

    /**
     * The attributes that should be hidden for arrays.
     *
     * @var array
     */
    protected $hidden = [
        'password',
        'remember_token',
        'two_factor_recovery_codes',
        'two_factor_secret',
    ];

    /**
     * The attributes that should be cast to native types.
     *
     * @var array
     */
    protected $casts = [
        'email_verified_at' => 'datetime',
    ];

    /**
     * The accessors to append to the model's array form.
     *
     * @var array
     */
    protected $appends = [
        'profile_photo_url',
    ];
}
Step 8: Create Routes
After adding google_id column first we have to add new route for google login. so let’s add bellow route in routes.php file.
app/Http/routes.php
Route::get('auth/google', [GoogleController::class, 'redirectToGoogle']);

Route::get('auth/google/callback', [GoogleController::class, 'handleGoogleCallback']);
Step 9: Create Controller
After add route, we need to add method of google auth that method will handle google callback url and etc, first put bellow code on your GoogleController.php file.
app/Http/Controllers/GoogleController.php
<?php

namespace App\Http\Controllers;

use Illuminate\Http\Request;

use Laravel\Socialite\Facades\Socialite;

use Exception;

use App\Models\User;

use Illuminate\Support\Facades\Auth;

class GoogleController extends Controller
{
    public function redirectToGoogle()

    {

        return Socialite::driver('google')->redirect();

    }
    public function handleGoogleCallback()

    {

        try {


            $user = Socialite::driver('google')->user();


            $finduser = User::where('google_id', $user->id)->first();


            if($finduser){


                Auth::login($finduser);


                return redirect()->intended('dashboard');


            }else{

                $newUser = User::create([

                    'name' => $user->name,

                    'email' => $user->email,

                    'google_id'=> $user->id,

                    'password' => encrypt('123456dummy')

                ]);


                Auth::login($newUser);


                return redirect()->intended('dashboard');

            }


        } catch (Exception $e) {

            dd($e->getMessage());

        }

    }
}
Step 10: Update Blade File
resources/views/auth/login.blade.php
<div class=" mt-4">

                <a href="{{ url('auth/google') }}">

                    <img src="https://developers.google.com/identity/images/btn_google_signin_dark_normal_web.png" style="margin-left: 3em;">

                </a>

            </div>
Ok, now you are ready to use open your browser and check here: URL + ‘/login’.
I hope it can help you…
Comments are closed