Hello friends, Today I am going to show you how to insert data in the MySQL database using JSP and servlet. In this example, we will insert data in the MySQL database using JSP pages and Servlet Controller.
To get the mysql database, we will install xampp application. In xampp we can get the features of mysql database and apache server to visualize the mysql data.
Download xampp from here.
Previous Post: How to install xampp in windows 10 | PHP (codesnipeet.com)
Previous Post: How to connect MySQL Database Using JSP and Servlet | (codesnipeet.com)
In this example, we will insert our daily expenses in the MySQL database. For this,
Create a web app:
To create a webapp, follow the steps:
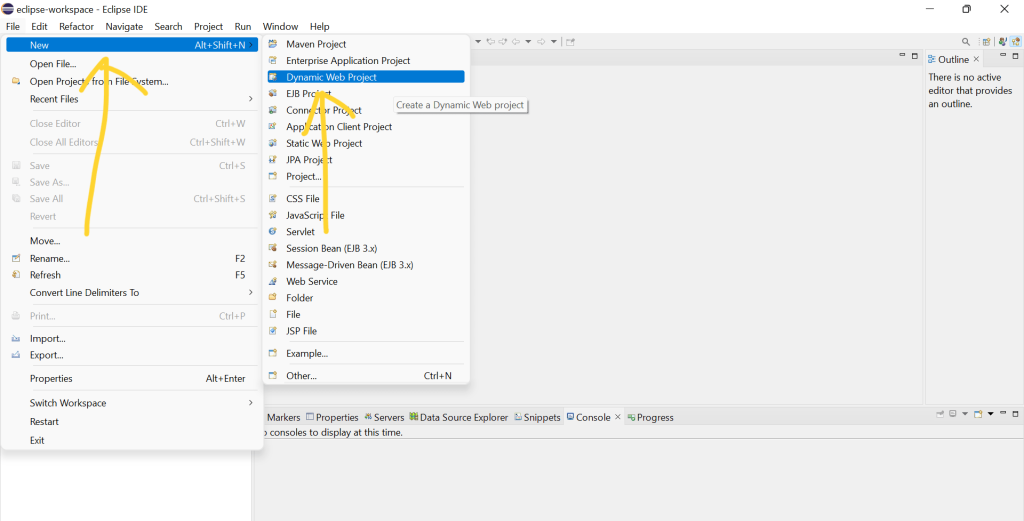
Step-1: Click File => New => Dynamic Web Project
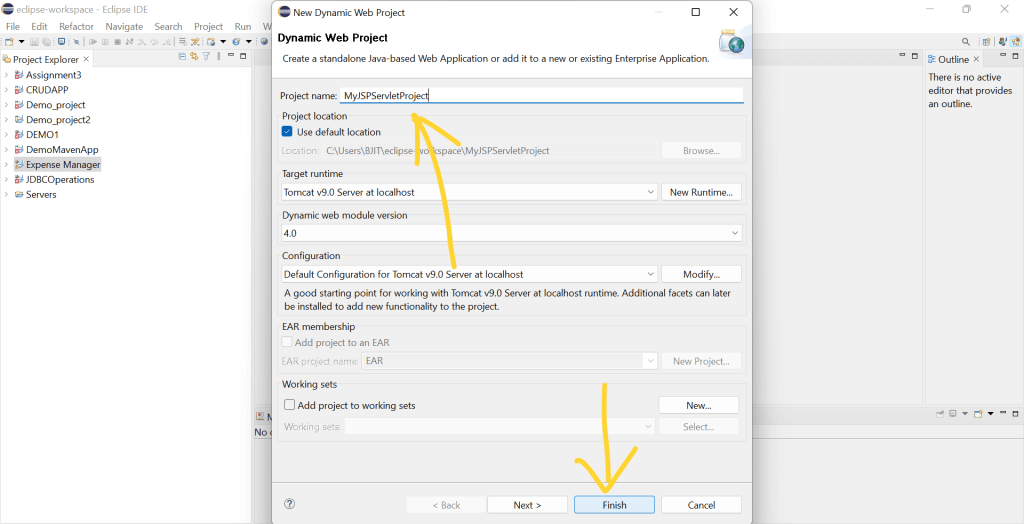
Step-2: Give a project name => Finish
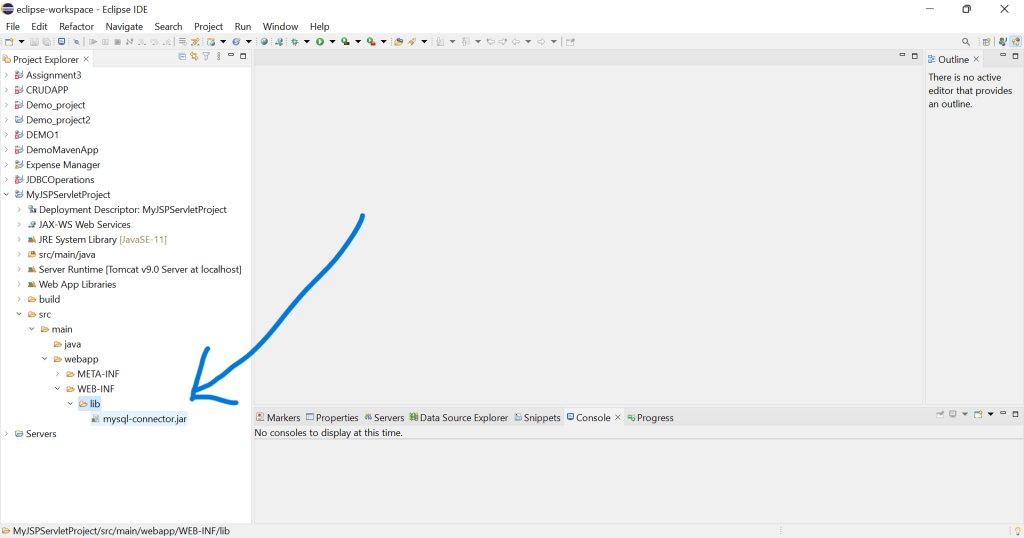
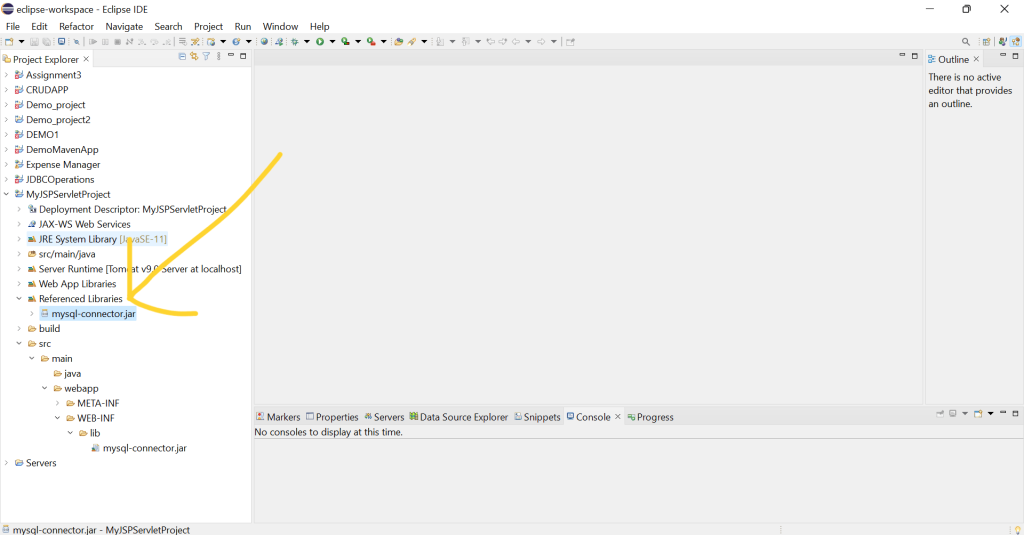
Step-3: Add the mysql-connector jar file in the lib folder.
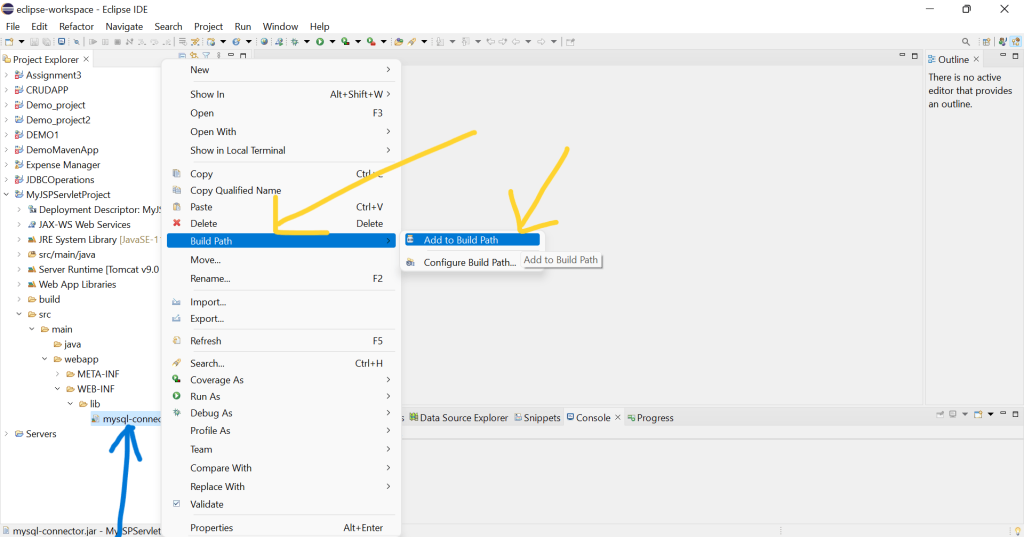
Step-4: Add the jar file to the build path.
Step-5: Check the jar file is added or not?
Step-6: Create a JDBCDao class(under the com.jdbc package) to connect the MySQL Database.
package com.jdbc;

import java.sql.Connection;
import java.sql.DriverManager;
import java.sql.SQLException;

public class JDBCDao {

	static final String DB_URL = "jdbc:mysql://localhost:3306/expense_management_system";
	static final String USER = "root";
	static final String PASS = "";
	static final String JDBCDRIVER = "com.mysql.jdbc.Driver";

	public void loadDriver(String driver) {
		try {
			Class.forName(driver);
		} catch (ClassNotFoundException e) {
			e.printStackTrace();
		}
	}

	public Connection getDatabaseConnection() {
		loadDriver(JDBCDRIVER);
		Connection conn = null;
		try {
			System.out.println("Connecting to the  database...");
			conn = DriverManager.getConnection(DB_URL, USER, PASS);
			System.out.println("Connected!");
		} catch (SQLException se) {
			se.printStackTrace();
		}
		return conn;
	}
}
Step-7: Goto src => main => webapp. Create a folder expense and within the expense folder create a add_expense.jsp page. Add the following codes:
<%@ page language="java" contentType="text/html; charset=ISO-8859-1"
	pageEncoding="ISO-8859-1"%>
<!DOCTYPE html>
<html>
<head>
<meta charset="ISO-8859-1">
<title>Add Expense</title>
<style>
.data-table {
	width: 50%;
	margin: 100px auto;
}

table {
	border: outset;
	line-height: 28px;
	text-align: center;
}

h2 {
	text-align: center;
}

td {
	height: 30px;
	padding: 3px;
	text-align: left;
}

input {
	height: 20px;
	width: 250px;
}

.success {
	color: green;
}

.failure {
	color: red;
}
</style>
</head>
<body>

	<div class="data-table">

		<div style="clear: both">
			<h2 style="float: left">
				<a href="<%=request.getContextPath()%>/expense?view">View
					Expense</a>
			</h2>
			<h2>Add New Expense</h2>
		</div>


		<table width="700">
			<%
			if (request.getAttribute("status") != null) {
				if ((Boolean) request.getAttribute("status") == true) {
					out.print("<p class=\"success\">");
					out.print("Data Inserted Success");
					out.print("</p>");
				} else {
					out.print("<p class=\"failure\">");
					out.print("Please Fillup all the fields");
					out.print("</p>");
				}
			}
			%>
			<form action="<%=request.getContextPath()%>/expense" method="post">

				<tbody>
					<tr>
						<td>Expense Name: <input type="text" name="expense_name"></td>
					</tr>
					<tr>
						<td>Category: <select name="category">
								<option>Select the category</option>
								<option>Transportation</option>
								<option>Food</option>
								<option>Fees</option>
								<option>Bills</option>
								<option>Entertainment</option>

						</select>
						</td>
					</tr>
					<tr>
						<td>Amount: <input type="number" name="amount"></td>
					</tr>
					<tr>
						<td>Description: <input type="text" name="description"></td>
					</tr>
					<tr>
						<td>Date: <input type="date" name="date"></td>
					</tr>
					<tr>
						<td><input type="submit" name="add_expense"
							value="add expense"></td>
					</tr>

				</tbody>
		</table>

	</div>
</body>
</html>
Step-8: Create a Model named as Expense.java class (under the com.model package)
package com.model;

import java.sql.Date;

public class Expense {

	private Long id;
	private String expense_name;
	private String expense_description;
	private Double amount;
	private String category;
	private String date;

	public Expense(Long id, String expense_name, String expense_description, Double amount, String category,
			String date) {
		this.id = id;
		this.expense_name = expense_name;
		this.expense_description = expense_description;
		this.amount = amount;
		this.category = category;
		this.date = date;
	}

	public Expense(String expense_name, String expense_description, Double amount, String category, String date) {
		this.expense_name = expense_name;
		this.expense_description = expense_description;
		this.amount = amount;
		this.category = category;
		this.date = date;
	}

	public Expense() {

	}

	public Long getId() {
		return id;
	}

	public void setId(Long id) {
		this.id = id;
	}

	public String getExpense_name() {
		return expense_name;
	}

	public void setExpense_name(String expense_name) {
		this.expense_name = expense_name;
	}

	public String getExpense_description() {
		return expense_description;
	}

	public void setExpense_description(String expense_description) {
		this.expense_description = expense_description;
	}

	public Double getAmount() {
		return amount;
	}

	public void setAmount(Double amount) {
		this.amount = amount;
	}

	public String getCategory() {
		return category;
	}

	public void setCategory(String category) {
		this.category = category;
	}

	public String getDate() {
		return date;
	}

	public void setDate(String date) {
		this.date = date;
	}


}
Step-9: Create a Servlet named as ExpenseManagerController.java class(under the com.controller package)
package com.controller;

import java.io.IOException;
import javax.servlet.ServletException;
import javax.servlet.annotation.WebServlet;
import javax.servlet.http.HttpServlet;
import javax.servlet.http.HttpServletRequest;
import javax.servlet.http.HttpServletResponse;

import com.model.Expense;
import com.jdbc.JDBCDao;

@WebServlet("/expense")
public class ExpenseManagerController extends HttpServlet {
	private static final long serialVersionUID = 1L;
	private JDBCDao jdbc;

	public ExpenseManagerController() {
		jdbc = new JDBCDao();
	}

	protected void doGet(HttpServletRequest request, HttpServletResponse response)
			throws ServletException, IOException {

		if (request.getParameter("add") != null) {
			request.getRequestDispatcher("expense/add_expense.jsp").forward(request,
					response);

		}

	}

	protected void doPost(HttpServletRequest request, HttpServletResponse response) throws ServletException, IOException {
		if (request.getParameter("add_expense") != null) {
			String name = request.getParameter("expense_name");
			String category = request.getParameter("category");
			String amount = request.getParameter("amount");
			String date = request.getParameter("date");
			String description = request.getParameter("description");

			if (name.length() != 0 && category.length() != 0 && amount.length() != 0 && date.length() != 0
					&& description.length() != 0) {

				Expense expense = new Expense();
				expense.setExpense_name(name);
				expense.setCategory(category);
				expense.setAmount(Double.parseDouble(amount));
				expense.setDate(date);
				expense.setExpense_description(description);

				Boolean status = jdbc.insertExpenseData(expense);
				request.setAttribute("status", status);

			} else {
				request.setAttribute("status", false);
			}

			request.getRequestDispatcher("expense/add_expense.jsp").forward(request, response);

		}
	}

}
Step-10: Add a insertExpenseData(Expense expense) in the JDBCDao.java class
	public boolean insertExpenseData(Expense expense) {
		Connection con = getDatabaseConnection();
		String sql = "";
		sql = "INSERT INTO expenses (expense_name,expense_description,category,amount,date) VALUES (?,?,?,?,?)";
		try {
			PreparedStatement ps = con.prepareStatement(sql);
			ps.setString(1, expense.getExpense_name());
			ps.setString(2, expense.getExpense_description());
			ps.setString(3, expense.getCategory());
			ps.setDouble(4, expense.getAmount());
			ps.setString(5, expense.getDate());
			ps.executeUpdate();
		} catch (SQLException e) {
			e.printStackTrace();
		}
		return true;
	}
The final JDBCDao.java class should be like:
package com.jdbc;

import java.sql.Connection;
import java.sql.DriverManager;
import java.sql.PreparedStatement;
import java.sql.SQLException;

import com.model.Expense;

public class JDBCDao {

	static final String DB_URL = "jdbc:mysql://localhost:3306/expense_management_system";
	static final String USER = "root";
	static final String PASS = "";
	static final String JDBCDRIVER = "com.mysql.jdbc.Driver";

	public void loadDriver(String driver) {
		try {
			Class.forName(driver);
		} catch (ClassNotFoundException e) {
			e.printStackTrace();
		}
	}

	public Connection getDatabaseConnection() {
		loadDriver(JDBCDRIVER);
		Connection conn = null;
		try {
			System.out.println("Connecting to the  database...");
			conn = DriverManager.getConnection(DB_URL, USER, PASS);
			System.out.println("Connected!");
		} catch (SQLException se) {
			se.printStackTrace();
		}
		return conn;
	}

	public static void main(String[] args) {
		JDBCDao dao = new JDBCDao();
		dao.getDatabaseConnection();

	}

	public boolean insertExpenseData(Expense expense) {
		Connection con = getDatabaseConnection();
		String sql = "";
		sql = "INSERT INTO expenses (expense_name,expense_description,category,amount,date) VALUES (?,?,?,?,?)";
		try {
			PreparedStatement ps = con.prepareStatement(sql);
			ps.setString(1, expense.getExpense_name());
			ps.setString(2, expense.getExpense_description());
			ps.setString(3, expense.getCategory());
			ps.setDouble(4, expense.getAmount());
			ps.setString(5, expense.getDate());
			ps.executeUpdate();
		} catch (SQLException e) {
			e.printStackTrace();
		}
		return true;
	}
}
Now it’s time to run:
Goto browser and hit the url: Add Expense
http://localhost:8080/MyJSPServletProject/expense?add
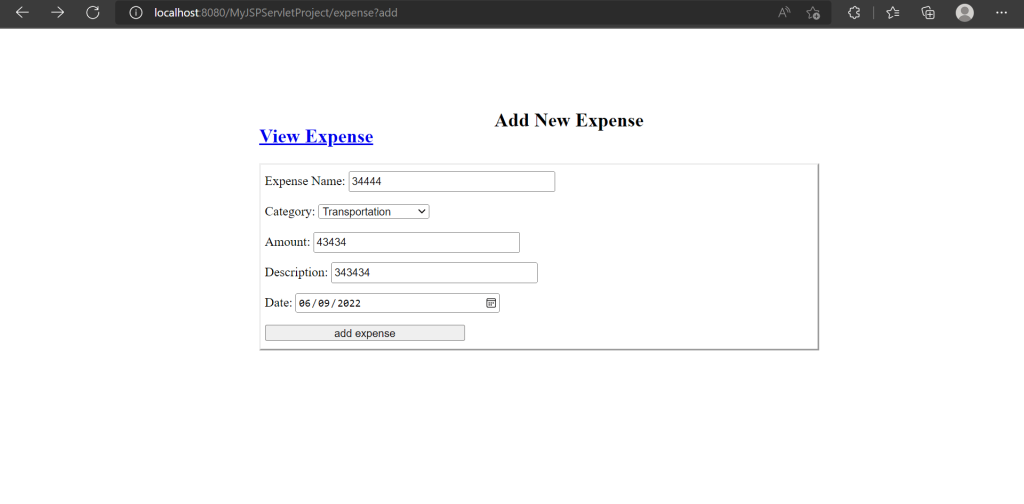
Saving the data

Data inserted success. Check in the MySQL Database.

Congrats, the data are inserted, if faced any problem fill free to comment.